
Repurpose a Yogurt Jar Into a Mini Cauldron!
I love an upcycle project or any way that you can repurpose trash into treasures. And I’ve seen a lot of creators in the past repurpose old glass Oui French style yogurt jars into super cute craft projects! So I’ve been brainstorming for a while (and eating a LOT of yogurt lol) to think of a fun project I could do with these cute mini jars.

My goal for this season is to try not to buy any new fall or Halloween decor (unless it is something I just HAVE to have) and to try to just use what I already have collected over the years or to make my own DIY decor. I love that when you make your own decor, it also has the added bonus of a fun creative project to do that makes for a great way to celebrate the season. Especially if you are crafting with a group of friends or as a fun at-home date idea. And I think this Halloween project is the perfect idea for just that! Today I’m showing you how I turned these empty Oui yogurt jars into the cutest mini cauldrons that I am using to hold matches for all my cozy fall candles this season. Follow along below to try out this project!

Affiliate disclosure: This post may contain affiliate links. When you buy from these links, I may earn a small commission, at no additional cost to you. As an Amazon Associate, I may earn commissions from qualifying purchases from Amazon.com. Thank you for your support!
REPURPOSE A OUI YOGURT JAR INTO A MINI CAULDRON FOR HALLOWEEN

Supplies:
Empty glass Oui Yogurt jars
Polymer clay (any color will work since we are painting — I used Sculpey III clay for this project, but any type of oven bake clay will work)
Wax paper (optional)
Knife
Oven & baking tray
Tin foil or parchment paper
Masking tape
Flat black spray paint & matte Mod Podge (I’ll explain later, but I found out you actually shouldn’t spray paint baked polymer clay) OR black acrylic paint & paint brush
Matches & match striker stickers (optional)

STEP 1: Begin by thoroughly cleaning your yogurt jar and removing all the labels. If needed, use some Goo Gone (or something similar) to get rid of any sticky residue.
And preheat your oven to 275 degrees F (or whatever temperature your specific oven-bake clay requires).

STEP 2: Creating your clay elements! Lay out a piece of wax paper on your work surface. Pull off a piece of your polymer clay and knead it in your fingers until the clay feels soft and pliable. And form into a ball shape.
Carefully roll your clay ball against your palm and your work surface until you have a long skinny snake-like shape that is roughly 1/4 inch thick.

Use your knife to cut 4 equal size cylinders, about 1/2 inch in length. Carefully smooth the edges of these cylinders with your fingers and set them to the side. These will become your cauldron’s four feet.
Continue rolling your remaining clay into a thinner snake. Then cut two evenly sized cylinders that are about 2-1/2 inch in length. Bend these cylinders into a circle shape and connect the ends together to form two circles. Cut two more small cylinders of clay (about 7/8 inch in length) and flatten these into rectangles. Wrap each rectangle around the place where your circles were joined together to create the shape of two cauldron ring handles.

STEP 3: Adhere the clay pieces to your glass jar. Polymer clay actually attaches to glass surfaces really easily so start by pressing your two clay cauldron handles to the sides of your jar. You should see two small seams in your glass jar, I just did one handle on either seam and tried to match up the height on both sides. Carefully press these clay pieces into the side enough that they attach but not enough to smoosh them. You might also want to use your fingers or a sculpting tool to bend the rectangular piece of clay at the top of your ring handles into the glass to make it look like it is connected to the jar.
Now, turn your glass jar upside down and press your four feet cylinders into the 4 opposite corners of your jar base. You will want them to slightly bend outward to get the correct shape of a cauldron. You can mess with their shape with your fingers until you are happy with their positioning. You will also want to turn the jar back over (don’t worry they shouldn’t fall off) and gently press it into your work surface so that you know the feet will sit flat once baked.

STEP 4: Baking your project! Place your jar with the attached polymer clay pieces onto a baking sheet lined with tin foil or parchment paper. Place in your preheated oven and bake the project for about 15 minutes (or however long your clay instructions recommend).
Once your timer goes off, remove from oven and set aside to cool for about 20 minutes.

STEP 5: Next, you will want to permanently attach your clay pieces so they do not fall off your glass jar. Right now they might seem sturdy but eventually the pieces will fall off with everyday use, so I would recommend adhering the pieces with a strong glue, like E6000.
Gently pull off your clay cauldron handles. The clay should now be hardened after baking. Squeeze a tiny bit of glue to your clay handle and stick back in place on your glass jar. E6000 glue needs some time to cure, so I used masking tape to tape each piece in place while the glue was curing overnight.
For the feet, I found it best to attach your tape to the glass jar and to each clay foot before pulling it off the glass. Then adding your dot of glue and sticking the foot back down to make sure it goes back in the exact same place where it came up. Once your have added glue under each foot, I would also recommend sticking something flat on top (like a coaster or a book) to make sure your feet are still even and will sit flat once the glue dries.
Let your glue dry for about 24 hours before painting.


STEP 6: Finally, it is time to paint your cauldrons black. I started off by stuffing the inside of the cauldron with some scrap paper and taping the inside edge so that I didn’t get paint inside the jar. Then I sprayed on two even coats of flat black spray paint over the entire outer surface of my cauldrons. Unfortunately, I did not realize at this point that you cannot spray paint polymer clay — something in the aerosol of the spray paint interacts with the polymer clay and while the glass jar paint dried perfectly, any place that was made of polymer clay just stayed really sticky even after drying overnight.

To remedy this, I was able to paint two coats of matte Mod Podge over the polymer clay pieces (the feet and the handles) and it seems to have reduced the sticky texture. So I think I will still keep these ones! BUT, I also did a version where I painted the cauldrons with regular black acrylic paint and a paint brush.

This did work, but it required about 3 coats to get an opaque finish. And I found that it wasn’t as smooth as the spray paint option. Here are the two final results below for comparison — the spray painted version is on the left and the hand painted acrylic paint version is on the right.

Despite everyone’s advice to not spray paint polymer clay, I think for this project in particular, I would actually recommend the spray paint option. Just be sure to paint on some clear Mod Podge on the polymer clay pieces to reduce the stickiness.
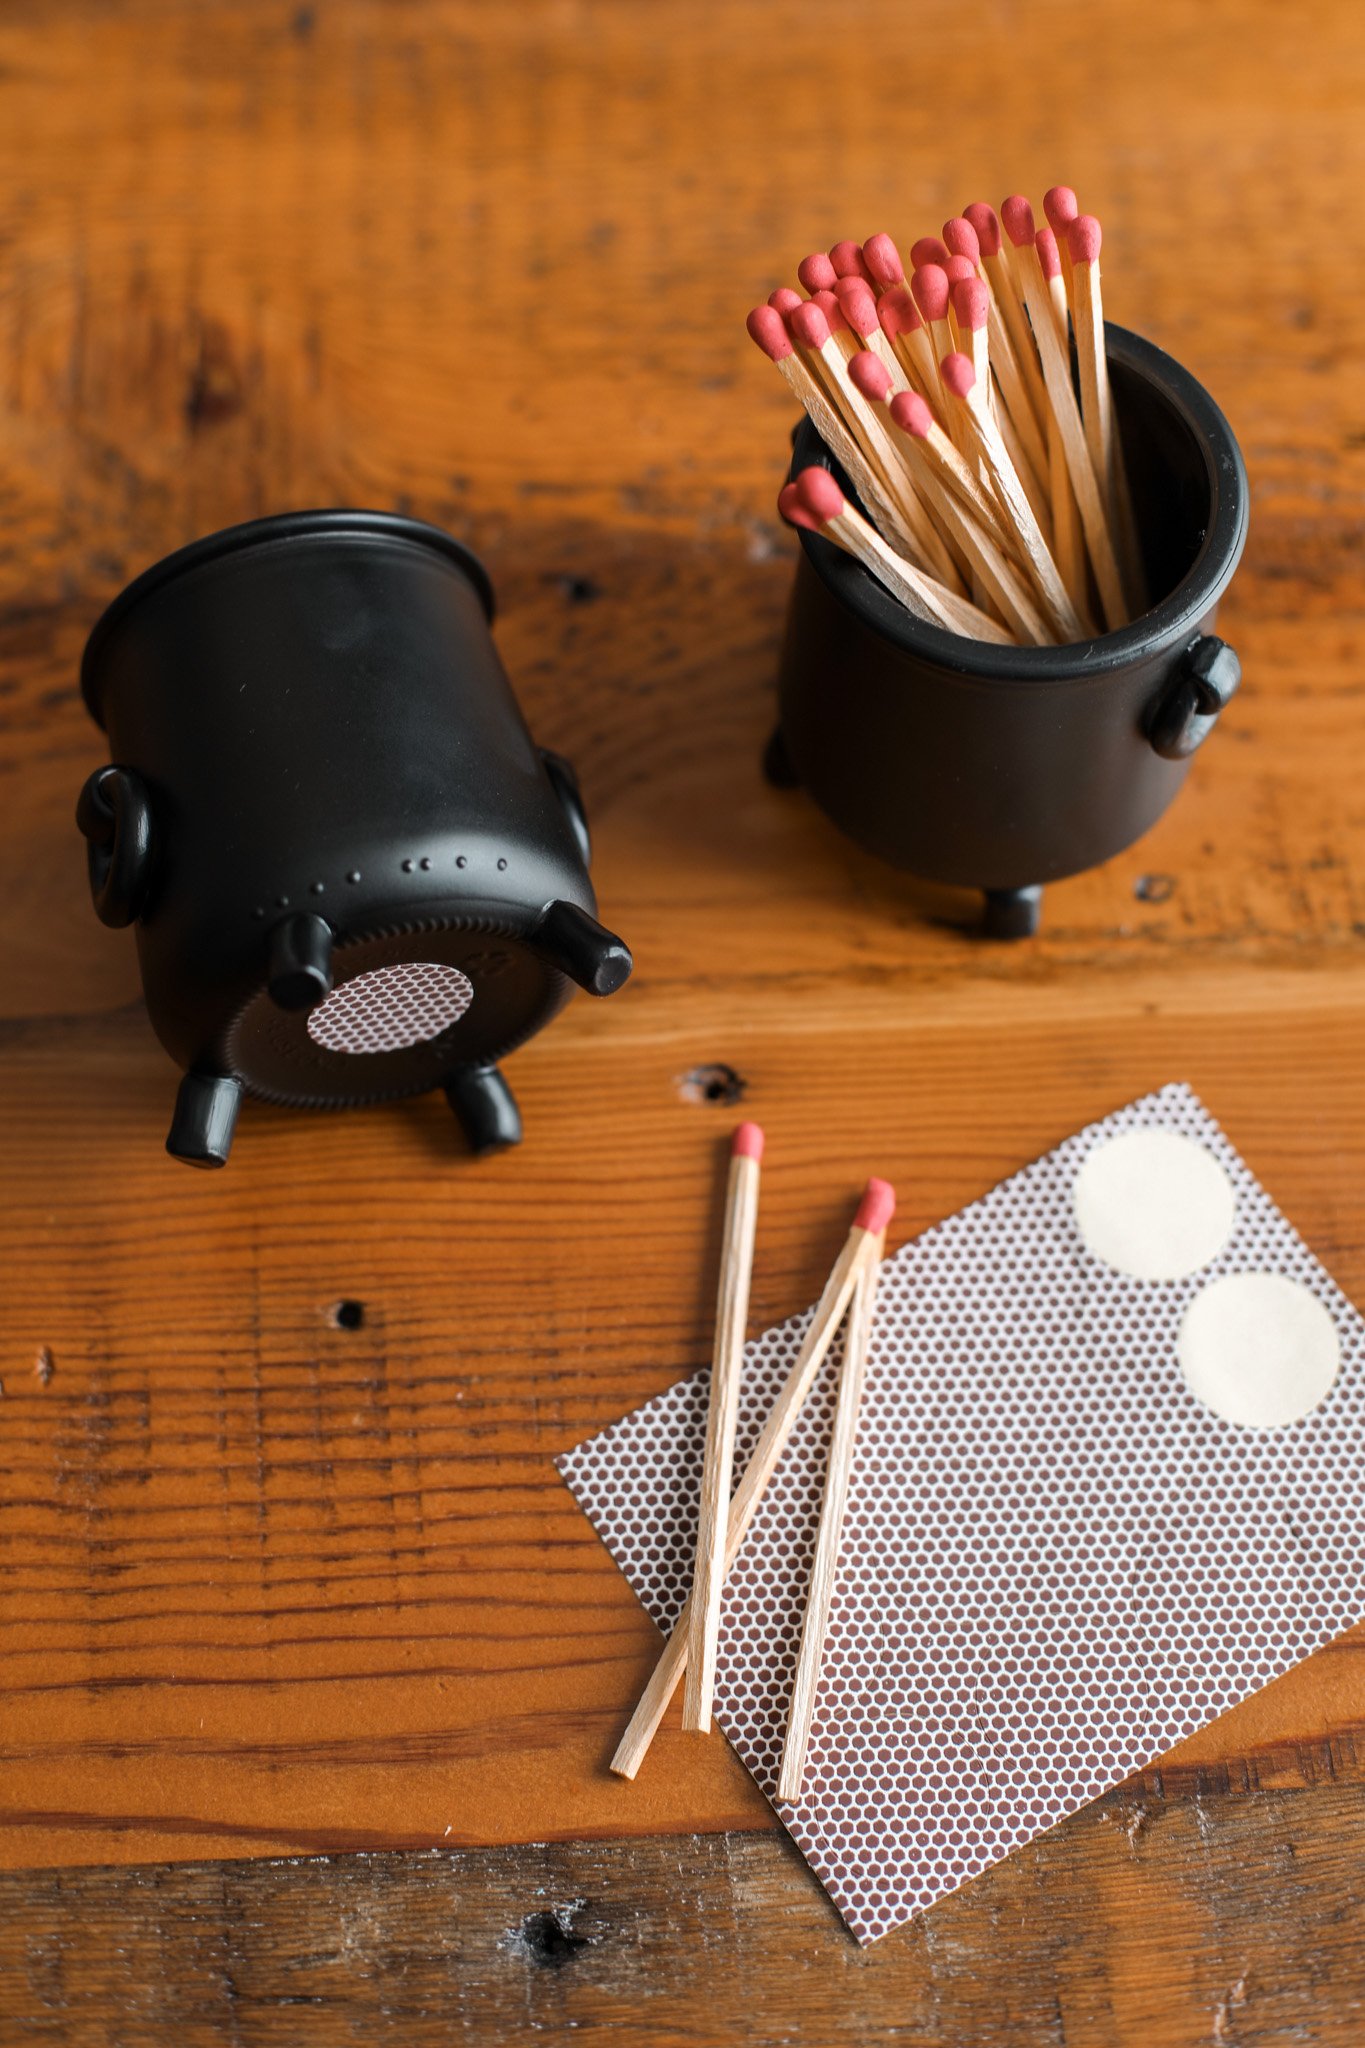
If you would like to use your mini cauldron as a match holder like I did, you can add a match strike sticker to the bottom of the glass jar and fill the jar with your long matches to display on your coffee table or shelves. But I’m sure there are a million other ways you could use this mini cauldron!


I’m so happy with how this project turned out, and very proud of myself that it was made mostly with trash and supplies that I already had on hand in my craft stash. What would you store in this mini cauldron?
Hope you are having a great start to the Halloween season!
xo Rachael

